Search This Blog

Sunday, September 25, 2016

A hands-on OpenOffice™ Base introduction by example using some mineral data

A contribution by Axel Drefahl, axeleratio.com, September 25, 2016.

Apache OpenOffice™ is an open-source office suite including word processing, spreadsheet, presentation, graphics and database software [1]. Its database tool is called OpenOffice™ Base, shorter ooBase or simply Base. OpenOffice started out as an open-sourced version of  StarOffice (1985-1999) [2]. Later, the suite development fractured into the Apache OpenOffice project and the LibreOffice project.

Today, two separate office suites, which were built on the same original code, exist [3]. Both, OpenOffice and LibreOffice can be downloaded for free for Windows, Linux and Mac. The two projects share most of their code. Interfaces and feature are similar. Without going into any further detail of difference, we will here get started with OpenOffice to get a hands-on experience for a desk top database management system that save your data and metadata in a single file. If you are using Microsoft Access, you will find many similarities. Otherwise, learning ooBase provides the basic skills to continue with Access later—if you want to or need to. Data can be imported/exported both ways.  

You are going to learn how to handle the followings tasks:
  1. Table design  (table layout),
  2. Table creation (data entry),
  3. Relationship between tables,
  4. Building queries in design view,
  5. Export of data table via OpenOffice Calc.
The provided examples use data from mineralogy [4]. Here are the lessons:
  1. Exploring OpenOffice Base: an example involving rare-earth mineral data  
  2. Structuring rare-earth mineral data in an OpenOffice Base table
  3. Modifying the column layout of an existing OpenOffice Base table  
  4. Defining and creating relationships between OpenOffice Base tables  
  5. Creating a query in OpenOffice Base
  6. Combinatorial querying-with OpenOffice Base  
  7. Exporting an Openoffice Base table into a file with Comma Separated Values (CSV) format
Apache OpenOffice 4.1.1 was used on Window 10 to test the examples and create the sample files RareEarthMinerals_2tables.odb and RareEarthMinerals_query.odb.

It should go without saying that these lessons provide a quick start, but cover only a few selected features and capabilities of ooBase.


References and more to learn
[1] Apache OpenOffice™: Why should I use Apache OpenOffice? [www.openoffice.org/why/index.html].
[2] Wikipedia: OpenOffice.org [en.wikipedia.org/wiki/OpenOffice.org],
[3] How-To Geeks: OpenOffice vs. LibreOffice: What's the Difference and Which Should You Use?  [www.howtogeek.com/187663/openoffice-vs.-libreoffice-whats-the-difference-and-which-should-you-use/].
[4] Appendix of the contribution “Mineralogy of the Rare-Earth Elements” by F. P. Cesborn in: P. Möller, P. Černý and F. Saupé. Lanthanides, Tantalum and Niobium. Springer-Verlag, Berlin Heidelberg, Germany, 1989.
Saturday, September 24, 2016

Exporting an OpenOffice™ Base table into a file with Comma Separated Values (CSV) format

A contribution by Axel Drefahl, axeleratio.com, September 24, 2016.

This post continues my preceding OpenOffice™ Base (ooBase) lessons:
  1. Exploring OpenOffice Base: an example involving rare-earth mineral data  
  2. Structuring rare-earth mineral data in an OpenOffice Base table
  3. Modifying the column layout of an existing OpenOffice Base table  
  4. Defining and creating relationships between OpenOffice Base tables  
  5. Creating a query in OpenOffice Base
  6. Combinatorial querying-with OpenOffice Base 
A common database task is to export data into a plain-text file and adhering to a well-defined format such that the data can automatically be imported and resourced by other applications. In the following exercise we export our CesbronList into a CSV file:
  1. Open RareEarthMinerals_query.odb and click Tables in the Database pane bring the Tables pane in view.
  2. From the menu, select File > New > Spreadsheet to open an empty Calc sheet..
  3. In the Base window, right-click CesbronList and choose Copy from the context menu.
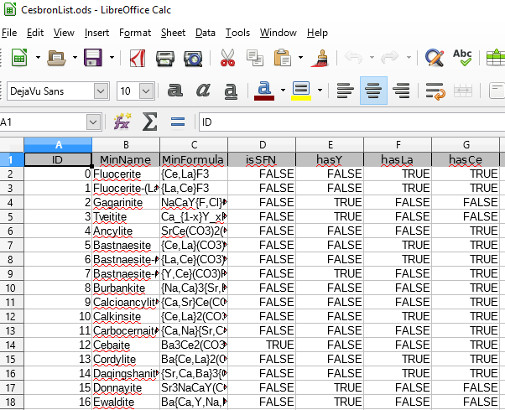
  4. In the Calc window, click cell A1 and Edit > Paste. The Base field names will show up as column headings in row 1 (cells A1 to U1) and the data will populate the cells of the rectangle with the diagonal-lined corners A2 and U168.
  5. In the Base window select File > Close to close RareEarthMinerals_query.odb.
  6. Continue with Calc. Select File > Save from the menu to save the imported data as CesbronList.ods (temporarily or longer,;you are the database administrator).
  7. Then, select File > Save As to open the dialog for outsourcing from OpenOffice™.
  8. Click the drop-down menu next to “Save as type” to view the export options. Select Text CSV (.csv)(*.csv) .
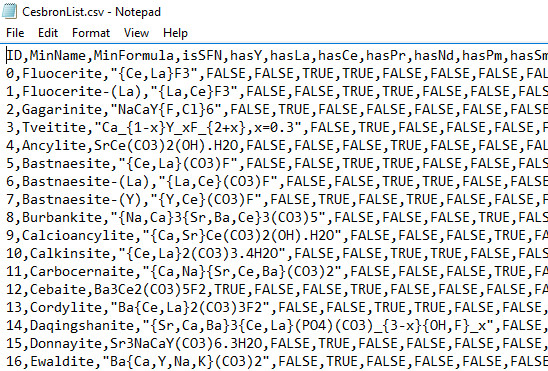
  9. Name the export file CesbronList.csv.
  10. Click Save to finalize the export.
CesbronList table exported into an OpenOffice Calc sheet

CesbronList table exported into a CSV file

As you certainly have noticed, the drop-down menu of the “Save as type” text field displayed a list of various export options, some of which you also may want to try. Have fun!

Friday, September 23, 2016

Combinatorial querying with OpenOffice™ Base

A contribution by Axel Drefahl, axeleratio.com, September 23, 2016.

This post continues my preceding OpenOffice™ Base (ooBase) lessons:
  1. Exploring OpenOffice Base: an example involving rare-earth mineral data  
  2. Structuring rare-earth mineral data in an OpenOffice Base table
  3. Modifying the column layout of an existing OpenOffice Base table  
  4. Defining and creating relationships between OpenOffice Base tables  
  5. Creating a query in OpenOffice Base
Now let's check out how we can customize ooBase queries. By combining query criteria you can filter database records in many ways to fit your specific interest. Continuing with the just designed query, we explore how to find minerals that contain a desired combination of rare-earth minerals (REEs):
  1. In the Queries pane right-click QueryByREE and then select Edit from the context menu to open the Query Design window showing your current design from the last lesson.
  2. Click into the empty cell next to the hasY cell in the Field row. From the selection list select CesbronList.hasLa.
  3. Repeat step 2 for all other fields that you want to include in the query: CesbronList.hasCe to CesbronList.hasLu.
  4. All cells of the Visible row show a check mark for field visibility in the Table Data View, which you may want to switch into when done with the query design. If you only expect to see the ID, mineral name and mineral formula, set the visibility to “No” by “clicking the check mark off.” 
  5. At this point, the only set Criterion you see is TRUE for hasY. Delete the TRUE value. To see the minerals that contain cerium (Ce) and neodymium (Nd), enter TRUE into the respective Criterion cells. 
  6. Click the Run Query Icon: the resulting table shows ten records with the minerals satisfying the query; including minerals that contain other REEs besides Ce and Nd (first picture below).
  7. To see only those minerals that contain Ce and Nd, but no other REEs, enter FALSE into all other REE Criterion cells.
  8. Again, click the Run Query Icon to see the four minerals satisfying the modified query (second picture below). 

Query result with records of minerals containing Ce, Nd and other REEs

Query result with records of minerals containing Ce and Nd and no other REEs

This example illustrated how to filter minerals of a desired REE combination. By leaving individual hasREE criterion cells empty or entering TRUE or FALSE, you can combinatorial filter minerals whether they certainly contain, certainly do not contain or may or may not contain a particular REE.

The ooBase file we have built up to now over six lessons is available as RareEarthMinerals_query.odb for testing and experimenting.

Thursday, September 22, 2016

Creating a query in OpenOffice™ Base

A contribution by Axel Drefahl, axeleratio.com, September 22, 2016.

This post continues my preceding OpenOffice™ Base (ooBase) lessons:
  1. Exploring OpenOffice Base: an example involving rare-earth mineral data  
  2. Structuring rare-earth mineral data in an OpenOffice Base table
  3. Modifying the column layout of an existing OpenOffice Base table  
  4. Defining and creating relationships between OpenOffice Base tables 
A query can answer specific questions about data stored in an ooBase application. Queries support you in maintaining and updating the database. You will consider using a query to review, filter and modify data as well as performing tasks such as calculations and report generation.

Running a query results in a table. Before running it, we need to create it. In the following example we use the ooBase Design View tool to create a query that selects all minerals from CesbronList that contain yttrium (Y):

  1. Open RareEarthMinerals_2tables.odb. If not yet done, create the relationship as shown in the previous lesson.
  2. Click Queries in the Database pane.
  3. In the Tasks pane, select Create Query in Design View... to open the Query Design window with the pop-up Add Table or Query dialog.
  4. Add CesbronList and Close the Add Table or Query dialog.
  5. From the appearing CesbronList field list, drag the names of those fields you want to include in your query into the cells of the Field row of the table in the lower section of the Query Design window: drag ID, MinName, MinFormula and hasY into the first, second, third and fourth Field cell, respectively. Notice that the first four Table cells indicate the source table, CesbronList, and the first four Visible cells include the Yes check mark.  
  6. To select all minerals with hasY set to Yes, click into the hasY cell of the Criterion row and enter TRUE.
  7. Click the Run Query Icon (or press F5 key). A table (view) with 74 records representing exactly those minerals that contain yttrium appears between the menu bar and the query design table.
  8. Open the Save As dialog by selecting File > Save from the menu in the Query Design window and enter QueryByREE as Query name, then press the OK button. Close the Query Design window.   
  9. In the Queries pane, double-click QueryByREE to open and review the Table Data View window with the mineral data for the Y-containing minerals.

OpenOffice Base Query Design window
Query Design window after running the query by pressing the Run Query Icon (fourth icon from right in the upper menu bar in the above cut-out section

You can come back to your query at any time to reset the query critera and to include not-yet-selected fields into your query. In the next lesson we are going to extend QueryByRee such that we are enabled to filter minerals by any desired combination of rare-earth elements. 

Saturday, September 17, 2016

Defining and creating relationships between OpenOffice™ Base tables

A contribution by Axel Drefahl, axeleratio.com, September 17, 2016.

This post continues my preceding OpenOffice™ Base (ooBase) lessons:
  1. Exploring OpenOffice™ Base: an example involving rare-earth mineral data  
  2. Structuring rare-earth mineral data in an OpenOffice™ Base table
  3. Modifying the column layout of an existing OpenOffice™ Base table 
We already defined a one-to-many relationship (one mineral class contains many minerals) by including a secondary key with field name MinClassID in the CesbronList table. This key points to a specific mineral class in the MineralClasses table. So far, this relationship exists in our (mental) blueprint. To create the relationship, we need to implement it into our ooBase application. This is achieved as follows:
  1. If not yet done, open RareEarthMinerals_2tables.odb and go to ToolsRelationships... to open the Add Tables dialog.
  2. Add both tables, MineralClasses and CesbronList, into the empty space of the Relation Design window; then Close AddTables
  3. Put your mouse pointer on the MineralClasses.ID field, keep the left mouse button down, move the pointer over to CesbronList.MinClassID and release the mouse button. You should now see a 1-to-n line connecting the selected fields.
  4. Go to File > Save to conclude the relationship creation before closing the Relation Design window.
one-to-many relation between two OpenOffice Base tables
1-to-n connection between two tables

From now on you cannot put a value into a CesbronList.MinClassID cell which does not already appear in the MineralClasses.ID column: each mineral belongs to exactly one given class (within our design). If you enter a wrong value, you will receive a message stating an “Integrity constraint violation” error. Therefore, some experts recommend to implement relationships before starting to enter any data into the tables. But it is completely up to you in which order you proceed.


Thursday, September 15, 2016

Modifying the column layout of an existing OpenOffice™ Base table

A contribution by Axel Drefahl, axeleratio.com, September 15, 2016.


My recent posts “Exploring OpenOffice™ Base” and “Structuring rare-earth mineral data in an OpenOffice™ Base table” demonstrated how to get started with Open Office™ Base (ooBase) and create tables by developing them in design view and then entering data in spreadsheet view (data view).

Before you start defining relations between tables, you want to have their design (layout) being finished. In case you still want to add new columns (fields) to a table, you may will preferably append those to the existing ones before tying them up in relations.

There seems to be no way to directly insert columns between existing ones. Although column order (field order) does not matter structurally in a relational database, you may want a data-oriented column order in your spreadsheet view. This can be achieved indirectly by appending fields to an existing table, copying the table, rearranging its fields and then copying it back.

Let's walk through this by inserting a hasTi (for “has titanium”) column between hasLu and MinClassID in the CesbromList table. We use RareEarthMinerals_2tables.odb. Here are the steps:
  1. Open RareEarthMinerals_2tables.odb and click Tables in the left-side Database pane to open the Tables pane.
  2. In the Tables pane, right-click CesbronList to see the context menu: click Edit to open the table in design view.
  3. Add the Field Name hasTi with Field Type Yes/No [ Boolean ] into the first emoy row and Close the table.
  4. Back in the Tables pane, again right-click CesbronList, select Copy and then—still in the context menu—select Paste Special.
  5. In the Paste Special pop-up window select Data source table and press the OK button.
  6. In the opened Copy table window stay with the suggested table name CesbronList2 and with the option Definition and data and click Next>
  7. In the opened Apply columns dialog transfer the shown existing columns on the left to the right in the desired order and press the Create button when done.   
  8. In the Tables pane, right-click CesbronList and Delete it; then right-click CesbronList2 and Rename it to CesbronList. Voilà!


Sunday, September 11, 2016

Structuring rare-earth mineral data in an OpenOffice™ Base table

A contribution by Axel Drefahl, axeleratio.com, September 11, 2016.


My previous post “Exploring OpenOffice Base: an example involving rare-earth mineral data” demonstrated how to get started with OpenOffice™ Base (ooBase) and create a simple table. The table creation procedure is: (1) design the table in design view and (2) enter data in spreadsheet view (data view). If you are familiar with worksheets in spreadsheet applications, you know how to interact with an ooBase table. The interesting and useful development comes with table relations and task-specific table navigation to find data and synthesize information. The latter, however, depends on well-structured, resourceful data. Here, we “transfer” a table of  rare-earth mineral names associated with compositional formulas into an ooBase table we call CesbronList—named after F. P. Cesbron, who published this mineral/formula list as an appendix in a workshop contribution on rare-earth elements [1].

Designing the table CesbronList

We begin like we did with table MineralClasses by selecting Create Table in Design View… to open the Table Design window. Our first Field Name is MinName for the column of mineral names. The associated Field Type is Text [ VARCHAR ]. We stay with the default text length of 50, displayed in the Field Properties panel. The next Field Name is MinFormula, again with Field Type Text [ VARCHAR ]. In the Field Properties panel, we change the text length to 75 to make sure we have enough space for those long formulas with multiple subscripts and element-variation lists. These two columns would suffice to capture the mineral names and formulas of Cesbron's list. But we will include further columns to manage data handling based on mineral composition and mineral classification.

The third Field Name is isSFN with Field Type Yes/No [ BOOLEAN ]. This is a boolean descriptor indicating whether the given formula is compatible with the Stoichiometric Formula Notation (SFN) format or not. SFN-compatible formulas can be further processed with CurlySMILES-capable software [2].

The following 16 fields also are of Field Type Yes/No [ BOOLEAN ]. Their entries indicate whether the formula (and thus the mineral) contains a specific rare-earth element. The self-explanatory field names are: hasY, hasLa, hasCe, hasPr, hasNd, hasPm, hasSm, hasEu, hasGd, hasTb, hasDy, hasHo, hasEr, hasTm, hasYb and hasLu.

Finally, the last Field Name is MinClassID with Field Type Integer [ INTEGER ]. The MinClassID column contains secondary keys; each one matching one in the primary key column of table MineralClasses to refer to the mineral class of the respective mineral..

Unless you haven't done so by adding the fields, you now want to change Entry required from No to Yes for each boolean field to make real boolean; other wise you would have No or Yes or unspecified. Click into each Field Type cell and change to Yes in the Field Properties panel. You probably want to do the same for some other fields such as MinName, but not for those fields with a possibility to be left empty during initial data entry but to be updated at a later data-entry stage.

The table design is complete. Under the File menu, select Save, name the table CesbronList and press OK. Again, create a primary key with AutoValue Yes. Close the Table Design window.

Creating the table CesbronList

Now we need to fill in the data. The steps are:
  1. Click Tables in the Database panel,
  2. Open CesbronList drom the Tables panel,
  3. Enter your data,
  4. Select Close from File menu and press Yes if asked to save changes.   
You don't need to enter the data yourself. Instead, you can download a version containing the two tables MineralClasses and CesbronList.

Downloadable version: www.axeleratio.com/gems/db/REE/try/RareEarthMinerals_2tables.odb.

Use this version as a test base and starting point for the following steps in developing your rare-earth mineral database. 

A section of table CesbronList

Keywords: open source, ooBase, table design, design view, spreadsheet view, primary key, secondary key, field properties.

References
[1] “Mineralogy of the Rare-Earth Elements” by F. P. Cesborn in: P. Möller, P. Černý and F. Saupé. Lanthanides, Tantalum and Niobium. Springer-Verlag, Berlin Heidelberg, Germany, 1989.
[2] Axel Drefahl: CurlySMILES: a chemical language to customize and annotate encodings of molecular and nanodevice structures. Journal of Cheminformatics 2011, 3:1.
DOI: 10.1186/1758-2946-3-1.

Thursday, September 8, 2016

Exploring OpenOffice™ Base: an example involving rare-earth mineral data

A contribution by Axel Drefahl, axeleratio.com, September 8, 2016.


Apache OpenOffice™ 4.x versions come with a desktop database management system. OpenOffice Base, ooBase for short, is a free alternative to the Microsoft Access database [1]. I recently started to give ooBase a try. My test data were selected from the mineralogy of rare-earth elements (REE) and their compounds. 

With ooBase one can create relational databases—each application completely contained in one file. Design, testing and use of an ooBase application involves working with tables, queries, forms and reports. You typically will build and update tables, define relations between tables and then customize your application by adding queries, forms and report generating tools.

Herein, and in some following posts, I am going to share the initial development of my REE ooBase project, hoping that it will be helpful to others beginning with ooBase and that I can gain useful insight into ooBase's integrability and compatibility with other database systems—and existing chemical & mineralogical database applications and services, in particular.

I am continuing in the you and we form in present tense—also in the imperative mood—to engage the readers and followers of this project. The approach is to provide a tutorial-type experience—although the given REE ooBase example leans on my personal interest. The following typographical conventions are used to distinguish text and tools within the ooBase interface:

  • Title of a window, section or panel in bold blue: Database Wizard,
  • To be clicked text or button in bold black with gray background: Database,
  • Text requesting a user decision in bold red: What do you want to do?,
  • Text of a selection to be made in bold green: Create a new database
  • Text to be entered in bold purple: MineralClass,
  • File name in bold CourierRareEarthMinerals.odb,
  • Menu name in Courier: Help.
 

Let's get started! 

To create a new application, start Database in the start-up menu of your OpenOffice™ suite. Under What do you want to do? in the Database Wizard window select Create a new database, then press Next>>.in the bottom row of the window. Asked how to proceed after saving the database, stay with the default options Yes, register the database for me options and Open the database for editing, as shown below.

Default settings in creating an OpenOffice Database application

Select Finish. When the Save As window appears, type the name of your database. In our example, the file name is RareEarthMinerals.odb. Press Save to get the main ooBase window with the Database, Tasks and Tables areas.

Let's make the table MineralClasses

In the Tasks panel, select Create Table in Design View… to open the Table Design window. Now you are ready to design your first table. It will contain the names of mineral classes. Type MineralClass as the first field name and select Text [ VARCHAR ] as Field Type. The second Field Name will be Notes, also with Text [ VARCHAR ] as Field Type. The field names will show up as column headings, once data are entered in spreadsheet view (data view).  At the bottom of the window, you have the choice to change default settings for the field values. Here, we keep the default settings.

Design view of an ooBase table
Design view of an OpenOffice Database table

Under the File menu, select Save. You will be asked to name the table. Name it MineralClasses and press OK. The No primary key message box should appear, asking Should a primary key be created now? Every table requires a primary key column! Anwer with Yes to create a primary key. Now your first Field Name is ID, having Field Type Integer [ INTEGER ]. In the Field Properties panel, switch the AutoValue from No to Yes and close the Table Design window.

Next we populate table MineralClasses as shown below. Click Tables in the Database panel and then select MineralClasses in the Tables panel to open your table in spreadsheet view. We only fill in the MineralClass column.

Spreadsheet view of an OpenOffice Database table with 11 rows

Since we activated AutoValue, a primary key is automatically enter into the ID field when we finish its row. We leave the fields of the Notes column blank, but may want to come back later to enter mineral class details. 

The primary keys will serve as secondary keys or foreign keys in the next table we are going to create. This table contains the names and associated formulas, rare-earth minerals and some boolean descriptors of rare-earth minerals. Mineral names and formulas are taken from the literature [2]. The mineral class of each mineral is referenced by using the primary key in the table we just created.

Once the two-table database has been finished, we will be able to query it; for example, to look up the REEs a given mineral contains or to find all minerals that contain a given REE (or a given REE combination). Search results may then be arranged by mineral class as well as other criteria.  

Keywords: open source, ooBase, table design, design view, spreadsheet view, primary key, AutoField.

References
[1] Apache OpenOffice Base: https://www.openoffice.org/product/base.html.
[2] Appendix of the contribution “Mineralogy of the Rare-Earth Elements” by F. P. Cesborn in: P. Möller, P. Černý and F. Saupé. Lanthanides, Tantalum and Niobium. Springer-Verlag, Berlin Heidelberg, Germany, 1989.